How to Adjust Bike Brakes: Rim and Disc Brakes, Step by Step
Brakes that rub, squeal or pull to the bar are usually a ten-minute fix. Here is how to adjust V-brakes, caliper brakes and mechanical or hydraulic disc brakes at home.
How to adjust bike brakes: first work out which brakes you have. On rim brakes, line the pads up with the rim, set cable tension with the barrel adjuster and centre the arms. On mechanical disc brakes, align the caliper over the rotor and set the pad gap with the pad adjusters. On hydraulic disc brakes, loosen the caliper bolts, squeeze and hold the lever, then retighten the bolts to centre the caliper.
Well-adjusted brakes bite early, feel firm and stay silent. Most problems come from three things: a cable that has stretched, pads that have worn or moved, and a caliper or brake arm that has slipped off-centre. All three are easy to fix with basic tools.
Identify Your Brakes Before You Adjust Them
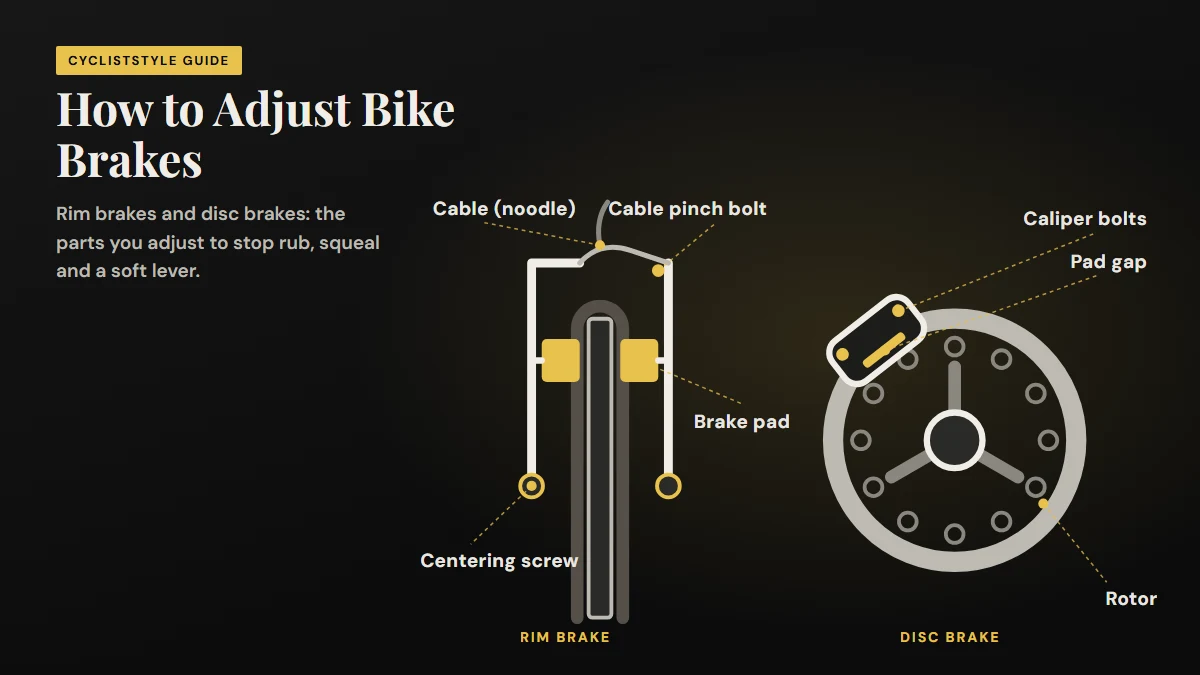
Every brake type adjusts a little differently, so start by checking what is on your bike:
| Brake type | How to recognise it | What you adjust |
|---|---|---|
| V-brake (linear pull) | Two tall arms on frame bosses; cable runs through a curved metal ‘noodle’ | Pad position, cable tension, centering screws |
| Caliper (dual pivot) | One horseshoe-shaped unit bolted above the wheel; common on road bikes | Pad position, cable tension, centering screw on top |
| Cantilever | Two short arms on bosses joined by a straddle cable; older touring and cross bikes | Pad position, straddle and cable tension, spring tension |
| Mechanical disc | Caliper at the hub with a steel cable | Caliper alignment, pad adjusters, cable tension |
| Hydraulic disc | Caliper at the hub with a smooth hose full of fluid | Caliper alignment and lever reach; bleeding is a shop job for most riders |
Tools you will need
- 4 mm and 5 mm hex keys
- T25 Torx key (many disc calipers)
- A rubber band (for pad toe-in)
- Sheet of white paper or a torch
- Clean rag and isopropyl alcohol
- Torque wrench (optional, recommended)
Do a 30-Second Brake Check First
The League of American Bicyclists’ Smart Cycling ABC Quick Check (air, brakes, cranks and chain) includes a simple brake test you can do before every ride:
- Squeeze each lever hard. It should stop well before touching the handlebar.
- Spin each wheel. It should turn freely without rubbing or squealing.
- Look at the pads. Rim pads should sit square on the rim; disc pads should have visible material left.
- Push the bike forward and brake. Each wheel should lock or stop cleanly.
How to Adjust Rim Brakes (V-Brakes and Caliper Brakes)
V-brakes and road calipers use the same three adjustments: where the pads sit, how tight the cable is, and how well the arms are centred.
How to Adjust Mechanical Disc Brakes
Mechanical (cable) disc brakes have a caliper at the hub that is pulled by a cable. You align the caliper to the rotor and set the pad gap.
How to Adjust Hydraulic Disc Brakes
Hydraulic brakes take up pad wear automatically, so there is no cable to tension. Adjusting them mostly means centring the caliper and setting the lever where your hand likes it.
If the lever feels soft or spongy, or pulls closer to the bar during a long descent, there is likely air in the system and the brake needs bleeding. That needs the right fluid (mineral oil or DOT fluid, depending on the brand) and a bleed kit, so most riders leave it to a shop.
Common Brake Problems and How to Fix Them
| Problem | Likely cause | Fix |
|---|---|---|
| Lever pulls almost to the bar | Cable has stretched or pads have worn | Turn the barrel adjuster out; on discs, wind in the pad adjusters. Replace worn pads. |
| Rim brakes squeal | Pads flat to the rim or a dirty rim | Add toe-in and clean the rim with a cloth and rubbing alcohol. |
| Disc brakes squeal or feel weak | Oil or grease on the pads or rotor | Clean the rotor with isopropyl alcohol. Contaminated pads usually need replacing. |
| Brake rubs all the time | Caliper or arms off-centre | Re-centre the arms or caliper (steps above). |
| Rub once every wheel turn | Bent rotor or wheel out of true | True the rotor or wheel, or ask a shop. |
| Hydraulic lever feels spongy | Air in the system | The brake needs bleeding. Most riders leave this to a shop. |
| Brake does not return after squeezing | Sticky cable or dirty pivots | Replace the cable and housing and lubricate the pivots (never the pads). |
Keeping your bike clean prevents a lot of these problems. Our guides on how to clean a road bike and how to lube a bike chain show how to do it without getting oil near the brakes.
When to Replace Brake Pads and Rotors
- Rim pads: most have grooves or a wear line. When those have worn away, replace the pads. Check the rim too; a concave or grooved braking surface means the rim itself is wearing.
- Disc pads: Shimano says to replace pads when the friction material is 0.5 mm or less. Measure the pad material only, not the metal backing plate.
- Rotors: each rotor has a minimum thickness printed on it or in its manual. Replace a rotor that is below it, badly bent or damaged.
New disc pads need bedding in before you rely on them. Follow the procedure in your brake’s manual: usually a series of firm stops from moderate speed down to walking pace, which lays a thin layer of pad material onto the rotor.
When to See a Bike Shop
Take the bike in if the hydraulic lever stays spongy, a hose leaks, the cable is frayed, a rotor or caliper mount looks bent after a crash, or the brakes still feel weak after you have done everything above. A shop can bleed hydraulic brakes, face misaligned mounts and replace cables properly.
Once your brakes are sorted, a helmet is the next safety upgrade worth getting right: see our best bike helmets. New to riding altogether? Start with how to ride a bike, or read what is a commuter bike if you are setting up a bike for daily trips.
How to Adjust Bike Brakes: FAQ
Which way do I turn the barrel adjuster to tighten bike brakes?
Turn the barrel adjuster out, unscrewing it from the lever or brake body, to take up cable slack and bring the pads closer to the rim or rotor. Turn it back in to add slack if the pads drag.
How tight should bike brakes be?
The brake should bite firmly before the lever is halfway to the handlebar, and the lever should never touch the bar when squeezed hard. The pads should not rub when you spin the wheel.
Why do my disc brakes rub?
The most common causes are a caliper that is slightly off-centre, a bent rotor or a wheel that is not seated straight. Re-centring the caliper fixes most cases; a rub that comes and goes once per turn points to a bent rotor.
Do hydraulic disc brakes need adjusting?
Hydraulic brakes adjust for pad wear on their own, so there is no cable tension to set. You may still need to centre the caliper, set lever reach, replace pads and occasionally bleed the system if the lever feels spongy.
How often should I adjust my bike brakes?
Check them before every ride by squeezing both levers, and give them a proper look whenever the lever feel changes, the brakes rub or squeal, or after you remove a wheel. Cable brakes usually need a small barrel adjuster tweak every few weeks of regular riding.
When should I replace brake pads?
Replace rim pads when the grooves or wear line are gone. For disc pads, Shimano says to replace them when the pad material is 0.5 mm thick or less. Measure the pad material only, not the metal backing plate.