Bikepacking Bags: The 6 Essential Types Every Bikepacker Needs
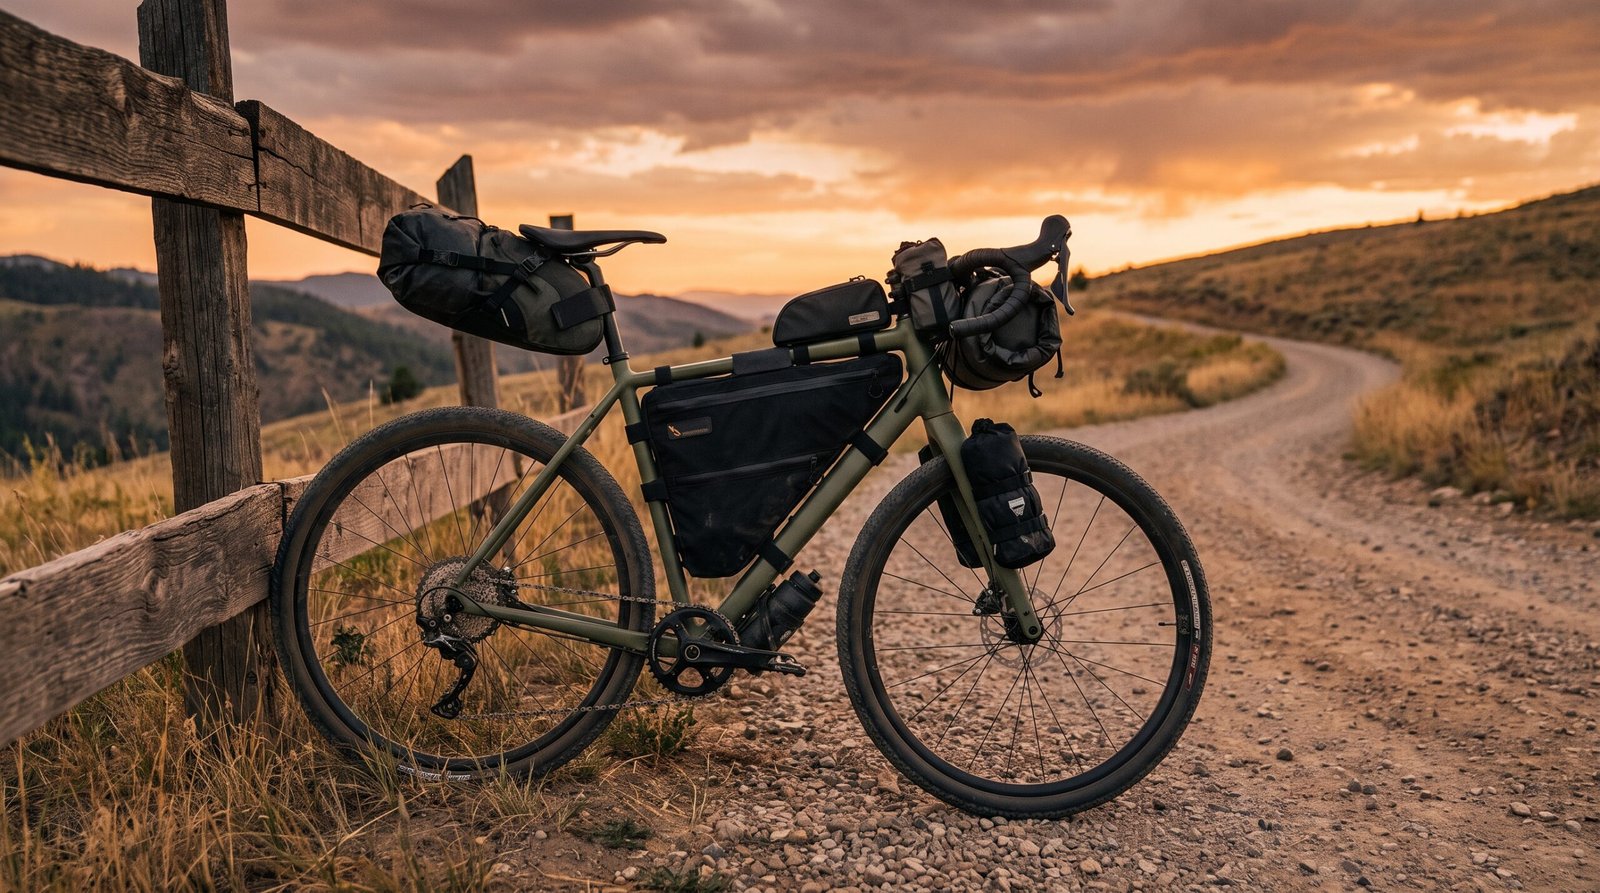
The right bikepacking bags are the difference between a bike that carries your adventure and a bike that fights you at every climb. Unlike pannier systems that bolt onto a rack, bikepacking bags attach directly to the frame and fork — keeping weight low, handling tight, and your setup trail-ready from day one. This guide covers the 6 essential bikepacking bag types, what each one is for, and the best pick for each available on Amazon right now.
A complete bikepacking bag setup typically combines three to five different bag types across the frame, handlebars, saddle, top tube, and fork legs. Each position has a job. Getting the combination right means you carry everything you need without overloading any single point on the bike. Here is how to build yours for 2026.
If you’re still planning your full kit, see the companion guide to bikepacking camping gear for tents, sleeping bags, and stoves. And make sure your bike is properly lit for early starts and late finishes with the best bike lights guide.
The 6 Essential Bikepacking Bags for 2026
Bikepacking Frame Bag
The frame bag is the foundation of any bikepacking bag setup. It sits inside the main triangle of the frame — the largest single space on the bike — and carries the heaviest items closest to the centre of gravity. Food, tools, a battery pack, and a water bladder all go here. A good frame bag fits the triangle precisely, leaving no wasted space and no swinging weight that throws off handling.
- Fits inside the main frame triangle — the biggest storage space on the bike
- Waterproof or water-resistant construction — protects tools and electronics
- Multiple compartments — separates tools from food from cables
- Low centre of gravity — keeps handling stable on technical trails
- Compatible with most frame sizes and geometries including gravel and MTB
Handlebar Bag / Roll Bag
The handlebar bag attaches to the front of the bike at the bars and fork crown, and it carries more volume than any other position in a bikepacking bag system. A sleeping bag, a down jacket, a lightweight tent, or a bivy all live here — bulky but light items that would eat the frame bag’s weight budget. The roll format compresses as contents shrink, keeping the load tight and aero even as you use your gear.
- Largest volume position in a bikepacking bags setup — 10-20L typical
- Roll-top or drybag construction — fully waterproof for sleeping gear
- Mounts at handlebars with fork straps — no rack needed
- Best for bulky, light items: sleeping bag, jacket, tarp
- Compatible with drop bars, flat bars, and most handlebar diameters
Saddle Bag / Seat Pack
The saddle bag mounts under the saddle and behind the seat post, and it is the second-highest volume position in any bikepacking bag system after the handlebar bag. Clothing, a sleeping pad, a cooking kit, or extra layers all go here. Modern seat packs use a rigid internal structure to prevent sway, which eliminates the heel strike and handling wobble that older designs suffered from. A well-fitted saddle bag disappears into the ride.
- Mounts below the saddle and seat post — no rack, no pannier hardware
- 8-16L capacity — the second-largest bikepacking bag position
- Internal structure or stiffener — prevents sway and heel strike
- Waterproof roll-top closure — clothing stays dry in all conditions
- Fits road, gravel, and mountain bike seat posts
Top Tube Bag
The top tube bag sits along the top tube of the frame between the saddle and the stem, and it is the most accessible bikepacking bag position on the bike. Everything you reach for while riding goes here: snacks, a phone, an emergency card, a lip balm, sunglasses. You do not need to stop. You do not need to unclip. Reach down, unzip, grab, and keep riding. For long days in the saddle this bag earns its place on every single ride.
- Sits on top of the frame — reachable while riding at full pace
- 1-2L capacity — sized for ride snacks, phone, and small essentials
- Magnetic or quick-access zip closure — opens with one hand
- Compatible with most top tube shapes and sizes
- Some models include a phone window for GPS navigation access
Stem Bag / Fork Cage Bags
Stem bags and fork cage bags use the space in front of the stem and along the fork legs — space that most cyclists leave completely empty. A stem bag sits just ahead of the handlebars for quick access; fork cage bags strap to the fork blades and carry water bottles, a tent, or a sleeping pad in a position that keeps weight low and forward. Together they add significant capacity without affecting bike handling, making them essential for multi-day bikepacking bag setups.
- Stem bag sits in front of the handlebars — quick access without stopping
- Fork cage bags mount on fork blades — carry bottles, tent, or rolled gear
- Uses space no other bikepacking bag reaches — zero wasted frame real estate
- Keeps heavy water weight low and centred — improves handling
- Straps to most fork diameters without tools
Dry Bags / Pack Liners
Dry bags and pack liners are the bikepacking bag accessory that most new bikepackers skip and every experienced bikepacker swears by. They go inside the main bikepacking bags to waterproof the contents independently of the outer bag’s rating. A sleeping bag inside a dry bag stays dry even if the handlebar roll takes a full river crossing or rides through twelve hours of rain. They also compress and organise gear inside larger bags, making a packed saddle pack or handlebar roll much easier to load and unload at camp.
- Waterproofs contents independently — insurance when the outer bag gets soaked
- Roll-top seal — submersion-rated in most sizes
- Compresses sleeping bags and down jackets for tighter packing
- Multiple sizes — fits every bikepacking bag position from stem to saddle
- Ultralight options under 50g — no weight penalty for total waterproofing
How to Build Your Bikepacking Bag Setup
Start with the core three bags
Every bikepacking bag system starts with the same three positions: frame bag, handlebar bag, saddle bag. These three together give you 20-40L of storage depending on sizing — enough for a full weekend trip with shelter, sleep, food, and clothing. Add the top tube bag, stem bag, and fork cages as a second layer once the core three are working well together.
Match bag size to frame and fork geometry
A bikepacking bag that doesn’t fit the frame wastes space or interferes with the drivetrain. Always check the frame triangle dimensions before buying a frame bag, and check fork blade diameter and spacing before ordering fork cages. Most brands publish compatibility charts. When in doubt, size down — a slightly smaller bikepacking bag that fits perfectly outperforms a larger one that gaps, sags, or rubs the tyre.
Weight distribution matters more than total capacity
The best bikepacking bags setup is the one that keeps the bike balanced, not the one that carries the most. Heavy items belong in the frame bag (centred, low). Light but bulky items go in the handlebar bag and saddle bag. The top tube bag, stem bag, and fork cages carry the rest. A badly loaded bikepacking bag system with weight in the wrong positions will make the bike handle like a loaded shopping trolley even at modest total weight.
Build Your Bikepacking Bag System Right
Frame bag for heavy items. Handlebar bag for your sleeping system. Saddle bag for clothing. Top tube bag for snacks. Stem and fork bags for water and a tent. Dry bags inside everything. That is a complete bikepacking bags setup — light, balanced, and ready for anything the trail delivers.
Once your bags are sorted, build out the rest of the kit with the bikepacking camping gear guide and the bikepacking essentials checklist. And for the right bike to put all of this on, start with the best commuter bikes guide.